|
Introduction
The Saab 9000 is fitted with a power steering system incorporating a steering
rack that is bolted to the subframe through two rubber bushes. Over time, these
can wear, leading to side-to-side movement of the steering rack during steering
giving rise to imprecision in handling. My steering rack had 1/4" side-to-side
movement. After fitting the new bushes, movement is practically gone and I found
a noticeable increase in the sharpness of the steering. The SuperFlex
polyurethane replacement bushes I fitted are stiffer and are claimed to last
much longer than the original bushes.
Although it may appear that the bushes are accessible without removing the
rack, the bushes require more force to remove and replace than can possibly
be applied in-situ. Also, the original rubber bushes can only be removed by
pressing them out of the underside of the rack.
This procedure documents removal and replacement of the power steering rack
and the replacement of the bushes once removed.
Time required
Naturally, this will vary with both the individual and what they find when
they get there. However, this took me about four and a half hours. This was
my first time and I spent a lot of time backtracking things I had done in the
wrong order. I imagine I could do it again in less than four hours, following
the order presented below. Naturally I wouldn't be taking notes and photographs,
either.
This procedure was performed on a right-hand-drive (UK-spec) car. Those right-handed
people with left-hand-drive cars may find the in-car work at the bottom of the
steering column rather easier and less time-consuming. This may speed up the
procedure somewhat.
Tools required
I assume some basic tools, such as a jack, axle stands, socket set, etc. However
I do not assume you will already have all the necessary metric socket and spanner
sizes, especially if you are in the USA. Here is a list so you can make sure
you have all the necessary sizes before you start.
Spanners
Sockets
- 8mm
- 10mm
- 13mm
- 14mm
- 16mm
- 17mm
- 18mm
Other
- Ball joint splitter. I much prefer the scissor type to the "pickle-fork"
type. I have used both, and much prefer the scissor type as it is both easier
to use and causes less damage, which is important if the joint is to be re-used.
- 1 litre of power steering fluid.
N.B. for my 1996 Aero, the handbook lists a Saab power steering fluid. I went
to two shops, one specialising in German and Swedish cars, and neither of
them could advise me what fluid I should use. They warned against taking a
chance because the wrong fluid could ruin the seals. I eventually went to
the company that recently replaced my engine, Neo
Brothers, and they confirmed that they had used Dexron II in my car, as
they did on other Saabs. I used Dexron III as it was available and is supposed
to be compatible with Dexron II. I have since been told by others (including
other Saab specialists) that Neo Brothers were wrong to use Dexron II and
that it will shorten the life of the rack.
I would advise checking which power steering fluid to use, as I was told it
varies with model year. Regardless, the power steering capacity is 0.75 litres
on all model years, so 1 litre should be sufficient.
Procedure
- Clean the area around where the return hose (small hose) joins the power
steering fluid reservoir. Note throughout this procedure that it is
very important to avoid introducing any dirt into the steering hydraulic
system. Remove the hose - a one-way valve in the reservoir will prevent
the fluid from draining away. The Haynes
manual says that this hose is the upper hose, but it was the lower
one on my car (1996 Aero).

- Place the end of the hose into a container of at least 1 litre capacity
and start the engine. Move the steering wheel slowly lock-to-lock twice. When
fluid stops pumping from the return hose, stop the engine. Be careful not
to run the steering pump dry for too long as this may damage it.
- Plug the end of the hose and the reservoir inlet to avoid ingress of dirt.
- Jack up the front of the car and place it on axle stands. If you are not
sure where you can safely place the jack and axle stands on a 9000, go here
for more information.
- Working inside the car, move the carpet and pull back the rubber gaiter
around the base of the steering column. I found it is possible to turn the
gaiter inside-out, which gives better access (right-hand-drive shown).

- Remove the lower steering column pinch-bolt using a 13mm spanner or a socket
with a short extension. Turn the steering wheel to make the bolt more accessible
- this is why it is better to jack the car up first.
N.B. on a 1987 9000 2.0 Turbo I owned previously, the pinch-bolt had a nut
on the other end. I don't know if this was standard or a bodge by a previous
owner, but if you come across this, you will need to hold the nut with a 13mm
spanner.

- Remove the sound insulation panel under the dashboard. Fasteners vary by
model year, but mine were of the type with a plastic pin in the centre. To
release this, press the pin in with a small screwdriver as far as it will
go, then prise out the fastener. To refit it later, pull the pin out from
the normally hidden part of the fastener (it will only go one way - inwards)
and re-insert it from the outside again. Press it home to lock the fastener
in position.

- Slacken the pinch-bolt and nut on the next joint up from the lower pinch-bolt,
using a 13mm socket and a 13mm spanner. Slide this part up towards the steering
wheel and clear of the steering rack spindle. It may be necessary to prise
it off the steering rack spindle. Remove this part.
- Moving the carpet aside to improve access, remove the four bolts holding
the dished metal panel using a 10mm spanner. On my right-hand-drive car, the
throttle linkage obscured the top right bolt so that the only way to remove
it was with a 10mm ring spanner with a slight crank in it. This is probably
not the case on a left-hand-drive car. However, I found this spanner to be
the best means of removing the other three bolts as well.
Remove the panel. It will probably need to be prised away from the floor.
- Remove both roadwheels.
- Remove the right front inner wing liner, documented here.
- Clean around the outlet hose union on the power steering pump, then remove
using a 15mm open-ended spanner. Be prepared for some spillage. Plug both
the end of the hose and the steering pump outlet to avoid dirt ingress.

- Detach the track rod ends from the swivel hubs by undoing the nuts with
an 18mm spanner or socket until they are flush with the ends of the threads
(to protect the threads) and separating them using a ball-joint splitter.
- If fitted, remove the upper and lower securing bolts on the subframe-to-wheelarch
steady bar, using a 16mm socket and 14mm socket respectively.

- On each of the two rack mountings, fit an 18mm spanner on the top nut to
stop it from turning and remove the bolt from underneath using a 17mm socket.
Retrieve all washers, noting the order in which they are fitted. N.B. On certain
1987 models, there is a 2mm washer on one of the bolts, between the steering
rack and the subframe.

- Pull the ends of the two hoses down and out through the right-hand wheel-arch.
Irrespective of left-hand or right-hand drive, withdraw the rack through the
right-hand wheel-arch.
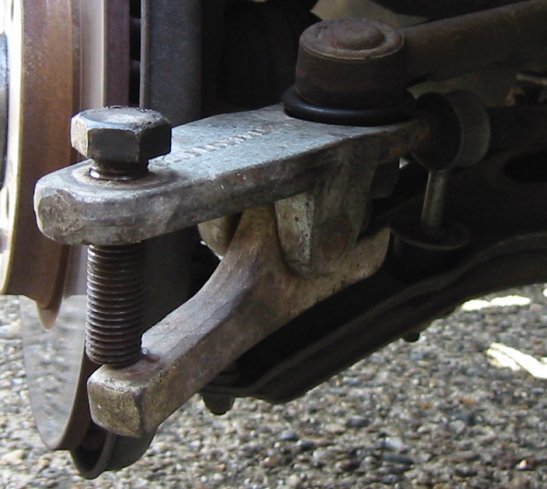
- Press or drift out the old bushes and press in new ones. The original rubber
bushes must be withdrawn from the bottom of the steering rack. They are a
single piece. The SuperFlex polyurethane
bushes I fitted as replacements are each supplied as two polyurethane parts
and a stainless steel inner piece.


- Pass the rack back into the subframe.
- Using an 18mm spanner above and a 17mm socket below, refit the mounting
bolts and nuts, along with the washers in the previously noted order. Torque
the bolts to 70Nm (52lbft).
- Refit the tie rod ends using an 18mm socket. If the swivel turns with the
nut, tap the top of the joint lightly with a hammer to seat it, then
apply hand pressure to the joint to hold it in its seat while slowly tightening
the nut. Torque the nuts to 55Nm (41lbft).
- Refit the hoses, taking care to avoid ingress of dirt. The pump outlet hose
union should be torqued to 27Nm (20lbft) or "just
tight".
- Refit the steady bar upper (16mm) and lower (14mm) bolts.
- Working inside the car, refit the dished plate (10mm spanner).
- Refit the intermediate steering column section using a 13mm socket and 13mm
spanner to torque the upper and lower pinch bolts to 27Nm
(20lbft).
- Refit the sound insulation panel under the dashboard.
- Replace the inner wheel arch liner as described here.
- Refit the roadwheels.
- Bleed the power steering system as follows:
- Top up the power steering fluid reservoir.
- Slowly move the steering wheel lock-to-lock a number of times to purge
air from the system, then top up the reservoir. Repeat until the fluid level
does not drop any further.
- Start the engine.
- Slowly move the steering wheel lock-to-lock a number of times to purge
any remaining air from the system. Repeat until no bubbles are seen in the
reservoir (don't remove the cap while the engine is running as fluid will
pump out of the reservoir). Strange noises from the steering system indicate
that there is still air in the system. With the engine stopped and the wheels
pointing straight ahead, the fluid level will rise. If this is the case,
repeat this step.
- Stop the engine and allow the system to cool.
- Top up the reservoir to the MAX mark, if necessary.
- Lower the car.
- Torque the roadwheel bolts to 115Nm (85lbft).
|